Basic Billiards Shots
Cross Loser
This is a basic billiards shot showing the use of side to still make the shot after slight wayward position allowing you to continue the break.
Diagram 1. This shot is played as half ball with no side.
Diagram 2. This shot is a slightly wider angle so to correct this you play it half ball with running side which throws the cue ball slightly wider thus making the shot.
Diagram 3. This example is a narrower angle and should be played half ball with check side so to keep the cue ball from throwing as much thus making the shot.
Firstly just practice each shot until you are comfortable with the reaction and the amount of side needed to get these shots.
Once you are happy that you can accomplish this with a high degree of success then practice each shot trying to get the red into the middle of the table to leave an in off red to centre, note that the red will come off the cushion at different angles depending on side and position playing from and each shot also requires a slightly different pace due to the white checking or running against red ball.
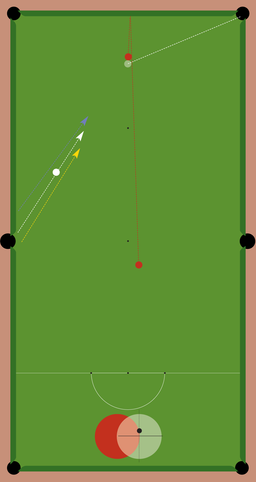
Diagram 1
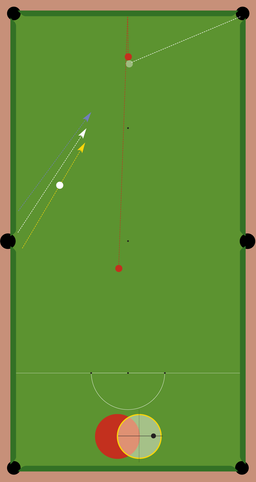
Diagram 2
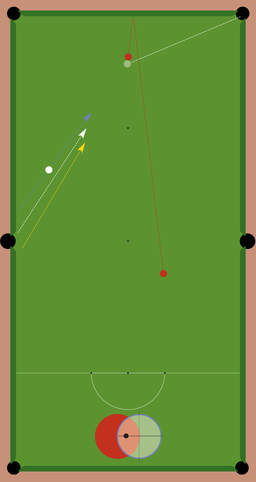
Diagram 3
Top Pocket Loser
Again this is a basic billiards shot showing the use of side to still make the shot after slight wayward position allowing you to continue the break.
Diagram 1. This shot is played as half ball with no side.
Diagram 2. This shot is a slightly wider angle so to correct this you play it half ball with running side which throws the cue ball slightly wider thus making the shot.
Diagram 3. This example is a narrower angle and should be played half ball with check side so to keep the cue ball from throwing as much thus making the shot.
Firstly just practice each shot until you are comfortable with the reaction and the amount of side needed to get these shots.
Once you are happy that you can accomplish this with a high degree of success then practice each shot trying to get the red into the middle of the table to leave an in off red or pot to centre, note that the red will come off the cushion at different angles depending on side and position playing from and each shot also requires a slightly different pace due to the white checking or running against red ball.

Diagram 1
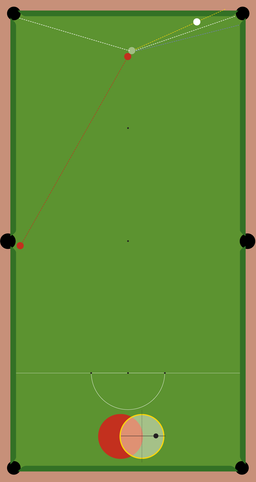
Diagram 2
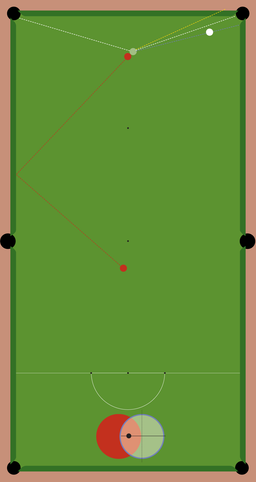
Diagram 3
Playing from a Re-Spot
After your opponent fouls you may wish to have the balls re-spotted. This is a basic billiards shot with a couple examples.
Diagram 1. This shot is played as half ball with no side at a slow pace.
Diagram 2. This shot is played slightly narrower with check side and more pace thus bringing the yellow round for an easy centre loser, It is a higher tariff shot than the first but the rewards are greater as you have 2 simple shots and are at top of the table position.
Once you are comfortable doing the first diagram then practice the second, however it is more important to get the shot each time in competitive games so therefore try to achieve a high success rate before attempting in matches.

Diagram 1
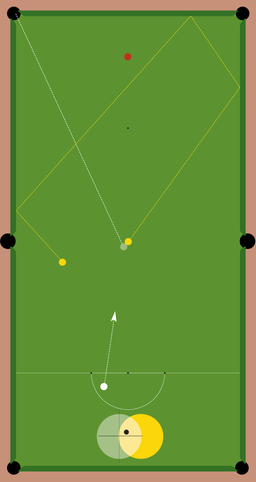
Diagram 2
Practice Sequences
Practice Sequence 1
Practice each shot separately then move onto sequence when confident with each shot, try achieving 8/10 successful attempts of each shot before moving on.
Diagram 1. Start with red on the Billiards spot and white slightly off centre, play a run through to bounce off the top cushion leaving cross loser into opposite corner.
Diagram 2. Start with red on spot and white in line with the pocket and play the cross loser to leave a pot into centre pocket
Diagram 3. With red around 10-12" from centre pocket and cueball in hand pot the red to the centre running through to leave a middle cross loser.
Now you are confident with each individual shot play all 3 shots in a sequence, if you run slightly narrow/wide on your position then use check/running side to correct.
see how many attempts it takes to complete the 3 visits. This routine will help with your general break building and positional play.
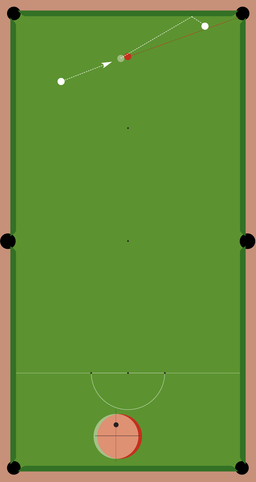
Diagram 1
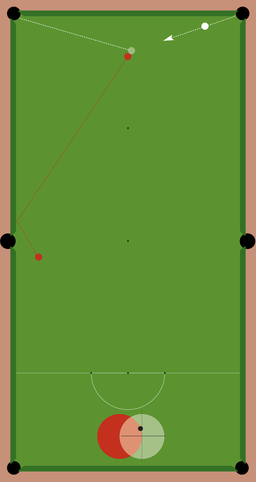
Diagram 2
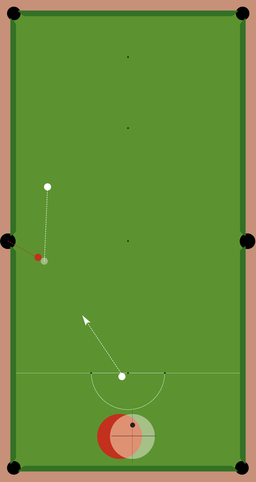
Diagram 3
Practice Sequence 2
Again practice each shot separately then move onto sequence when confident with each shot.
Diagram 3. With red around 10-12" from centre pocket and cueball in hand pot the red to the centre running through to leave a middle cross loser.
Diagram 4. Start with red on spot and white in line with the centre pocket and play the middle cross loser to leave the red for a middle pocket loser
Diagram 5. Play the middle pocket loser to bring the red back up the table for another middle loser.
Now you are confident with each individual shot play all 3 shots in a sequence, if you run slightly narrow/wide on your position then use check/running side to correct.
see how many attempts it takes to complete the 3 visits. This routine will help with your general break building and positional play.
Now you are able to complete both practice routines with some degree of success you can try the 5 shot routine by starting with Diagram 1 though to 5.
Diagram 3
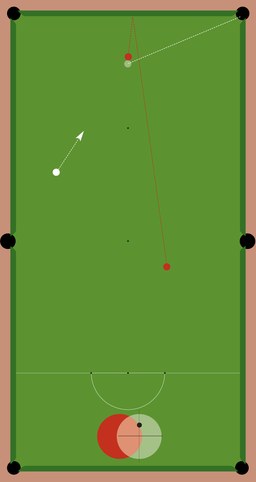
Diagram 4
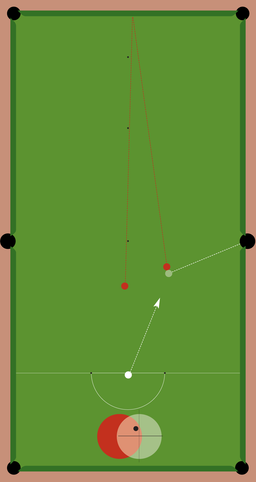
Diagram 5
Getting to Top of the Table
Practice Sequence 1
Practice each shot separately then move onto sequence when confident with each shot, try achieving 8/10 successful attempts of each shot before moving on.
Diagram 1. Start with a short jenny into centre pocket bringing the yellow out into play far enough to leave the drop white.
Diagram 2. Play the in off into centre pocket while dropping the yellow down behind the billiards spot.
Diagram 3. Pot the red into the centre pocket making sure you leave enough angle to play a cannon onto yellow for the next shot
Now you are confident with each individual shot play all 3 shots in a sequence, if you run slightly narrow/wide on your position then use check/running side to correct.
see how many attempts it takes to complete the 3 visits. This routine will help with advancing your billiards play to the next level and set you up for some big breaks.
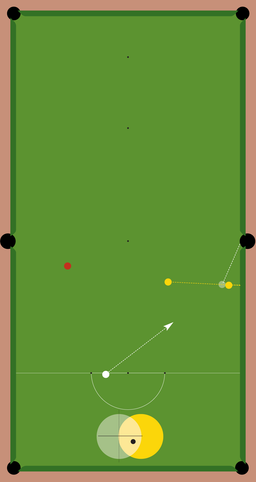
Diagram 1
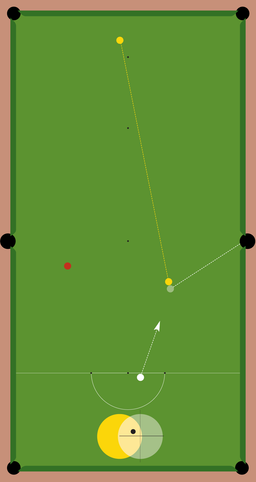
Diagram 2
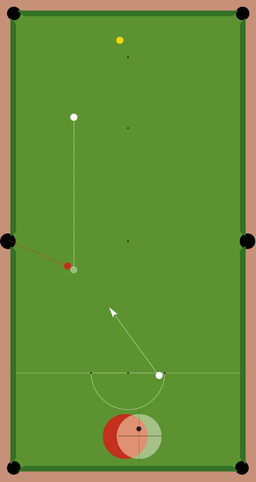
Diagram 3
Top of the table
Practice Sequence 1
Again practice each shot separately then move onto sequence when confident with each shot.
Diagram 4. Play the cannon onto yellow and pushing the red towards the pocket but the key is to make minimal contact onto the yellow so not to push it too far, your not trying to put red over the pocket just far enough to leave a simple shot (its easier to pot and control the white the closer you are too)
Diagram 5. Pot the red ball and stun up to leave a good angle for the next shot.
Diagram 6. Play a cannon off of the top cushion to push the yellow ball back closer to the billiards spot and pushing the red towards the pocket ready for a pot red.
Now you are confident with each individual shot play all 3 shots in a sequence, if you run slightly narrow/wide on your position then use check/running side to correct.
see how many attempts it takes to complete the 3 visits. This routine will help you to learn the basics of top of the table play and help you in maintaining control over the yellow ball.
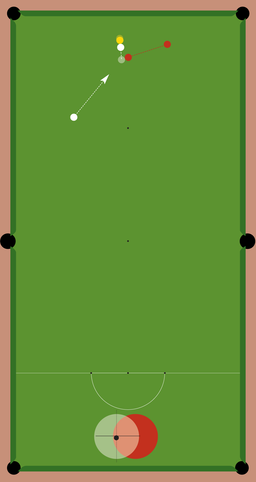
Diagram 4
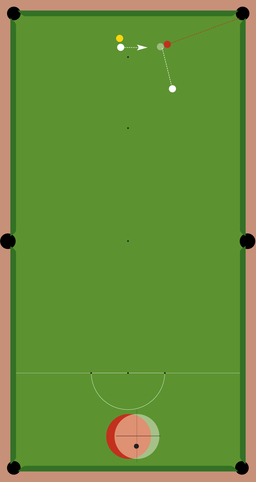
Diagram 5
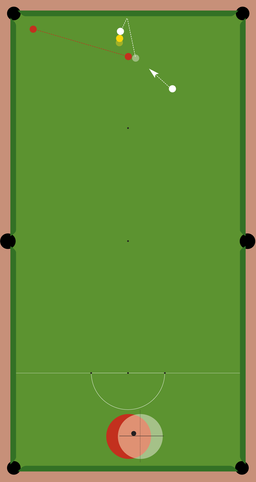
Diagram 6
Recovering top of table
Practice Sequence 1
Again practice each shot separately then move onto sequence when confident with each shot.
Diagram 7. Place yellow similar as in diagram 7 and play the in off to leave the yellow below the pyramid spot (pink spot), you can try this shot from various positions but always trying to leave the yellow around the same spot, the aim is to get yourself back into position.
Diagram 8. With the yellow around 4-6" below the pyramid spot play the long in off to bring the yellow around 2 cushions to leave yourself a Drop Cannon.
Diagram 9. With the ball in hand play the drop cannon to try and hit the red just left of centre thus minimising the risk of getting a cover on the next shot.
Now you are confident with each individual shot play all 3 shots in a sequence, this sequence is all about getting the correct pace for the shot as this is critical to stay in position.
see how many attempts it takes to complete the 3 visits. This routine will help you get into position to get back to top of the table.
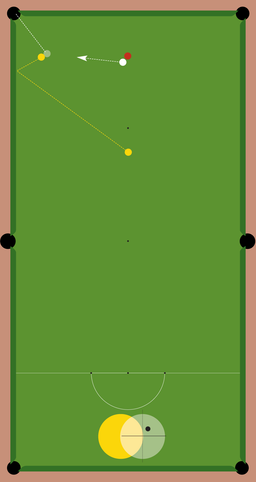
Diagram 7
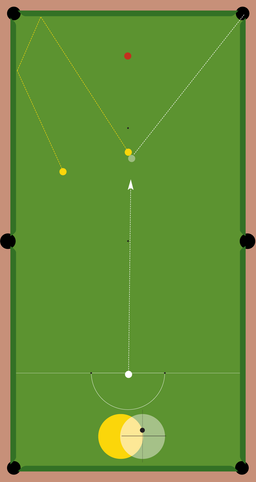
Diagram 8
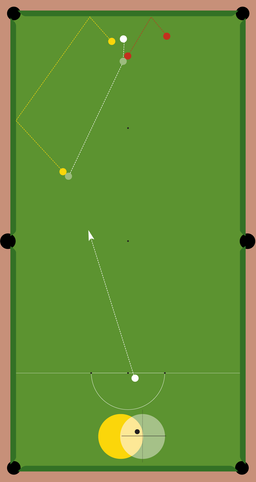
Diagram 9
Practice Sequence 2
As before practice each shot separately then move onto sequence when confident with each shot.
Diagram 10. Place yellow similar as in diagram 10, stun or screw (depending on the angle) past the pyramid spot (pink spot) leaving a half ball hazard on the yellow, you can try this shot from various positions but always trying to leave the yellow for a hazard.
Diagram 11. Play the hazard on the yellow bringing it down the table to leave the yellow for a drop cannon.
Diagram 12. With the ball in hand play the drop cannon to try and hit the red just left of centre thus minimising the risk of getting a cover on the next shot.
Now you are confident with each individual shot play all 3 shots in a sequence, this sequence is quite simple as there is a good margin of error for the pace of shots making it the best way to regain control at the top, the more you become familiar and proficient with the pattern of play it will help you by not trying to 'make' more difficult shots just to stay at TOTT and realise its easier to move away to regain position.
see how many attempts it takes to complete the 3 visits. This routine will help you get into position to get back to top of the table.

Diagram 10
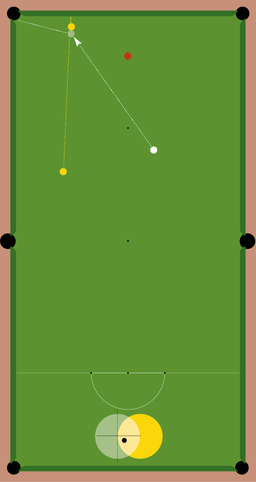
Diagram 11
Diagram 12
Practice Sequence 3
Again practice each shot separately then move onto sequence when confident with each shot.
Diagram 13. Place yellow similar as in diagram 1 and in various positions so its either touching or near the top cushion, pot the red to stun down slightly or play cueball off the top cushion if you prefer to leave the run through hazard.
Diagram 14. The run through hazard is a basic billiards shot and is much easier (when practiced) than it looks, I see many avoid this shot because they lack any confidence to go for a difficult looking shot, so please practice this shot with ample side to help pull the white into the pocket and confidence will improve massively, getting the yellow into position is critical on pace.
Diagram 15. With the ball in hand play the drop cannon to try and hit the red just left of centre thus minimising the risk of getting a cover on the next shot.
Now you are confident with each individual shot play all 3 shots in a sequence, this sequence is all about getting the correct pace for the shot as this is critical to stay in position.
see how many attempts it takes to complete the 3 visits. This routine will help you get into position to get to top of the table.
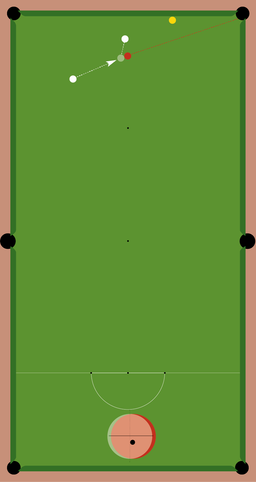
Diagram 13
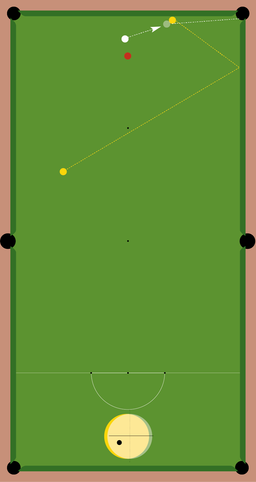
Diagram 14
Diagram 15
Easy Top
Practice Sequence
Play this sequence as a guide only. The key is to make minimal contact with the yellow ball by either playing the shot softly or hitting the red thicker so you can keep the break going longer before the yellow travels too far up the table.
This routine will help you score points easily and fast as long as you keep cannons to minimal contact. Try to record breaks and after a short period you will notice improvement and become more confident on scoring points from this position. I have witnessed players make 60+ breaks like this in no time at all.
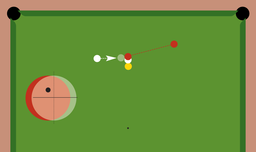
Diagram 1
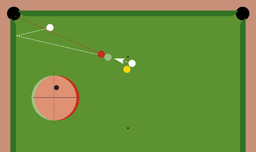
Diagram 4
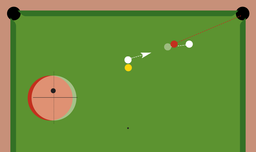
Diagram 2
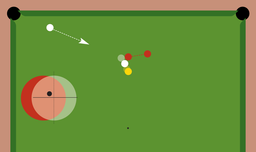
Diagram 5
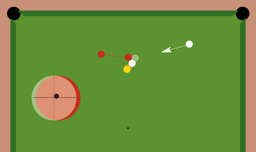
Diagram 3
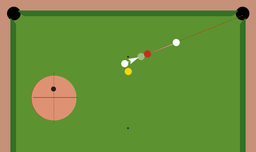
Diagram 6